I built this hut in the bush using naturally occurring materials and primitive tools. The hut is 2m wide and 2m long, the side walls are 1m high and the ridge line (highest point) is 2m high giving a roof angle of 45 degrees. A bed was built inside and it takes up a little less than half the hut. The tools used were a stone hand axe to chop wood, fire sticks to make fire, a digging stick for digging and clay pots to carry water. The materials used in the hut were wood for the frame, vine and lawyer cane for lashings and mud for walls. Broad leaves were initially used as thatch which worked well for about four months before starting to rot. The roof was then covered with sheets of paper bark which proved to be a better roofing material (*peeling the outer layer of bark does not kill this species of tree). An external fireplace and chimney were also built to reduce smoke inside. The hut is a small yet comfortable shelter and provides room to store tools and materials out of the weather. The whole hut took 9 months from start to finish. But it only took 30 days of actual work (I abandoned it for a few months before adding bark roof, chimney and extra daub).
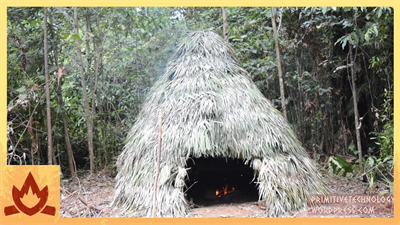
I built this thatched dome hut on a mountain ridge using completely primitive tools and materials. The frame was 2.5 m in diameter and 2 m tall. It was made from 8 thin saplings 2.75 m long, the thatching material was split palm fronds and vine was used for tying it all together. A stone hand ax was used to chop the saplings and a sharp stone flake was used to cut fronds. The pointed dome profile is half way between a spherical dome and a ti-pi. This shape sheds rain and funnels smoke effectively while still providing a large inner volume. A moat was dug around the hut to drain water away. As an afterthought I planted sweet potatoes and taro around the moat to hopefully provide some food later on.
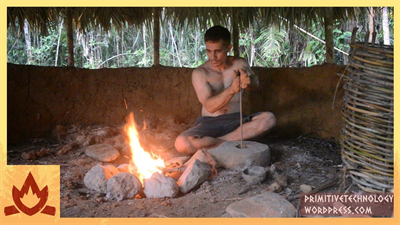
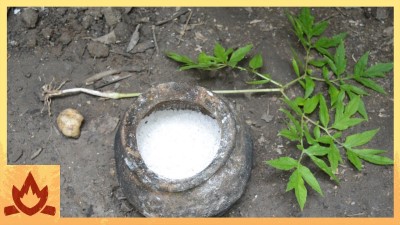
Making fire sticks primitively from scratch, making a fire using the sticks and making and firing a small pot to test clay from the hut. The species of wood used for the fire sticks is 'Abroma mollis'. In the hibiscus/cottonwood family (Malvaceae).
The manufacture of a stone ax including the handle from using only primitive tools and materials. It is a celt (pronounced "selt") a type of ax with a polished stone head wedged into a hole or mortise at the end of a wooden handle (not to be confused with a "Kelt" referring to a Celtic person). The head took about a week and a day to make as I chose to make it from a particularly large piece of basalt. The hammer stone used to shape the basalt was of quartz. This involved hammering, pecking, grinding and polishing the head into the final shape. The handle took a day and a morning to make. A chisel was made from stone and a mallet made from a log. These were used to cut the tree for the handle and shape it once down. Fire was used to harden the wood and also to help shape the mortise. The ax was then used to cut down a tree the day after the handle was a tree itself. It is a more efficient tool for felling trees than the hand ax I made and at the time of uploading this video has cut down 4 trees which I will use later. Because this stone axe is blunter than a steel one, the blade needs to hit the tree at angles greater than 45 degrees- otherwise the blade would glance off. So celts were used more like wedges than modern axes.
Cooking and leaching Black bean to remove the poison making it safe to eat. A basket was made to leach the poison out in a stream. Also shown are Atherton Oak nuts. The Aboriginal artifacts found near by were probably made by the Yidinji people (if you're reading this leave a comment below). It seems like a lot of effort to prepare black bean to eat but consider the effort that goes into making bread from scratch (plowing, sowing, winnowing, storing, milling, baking etc.). With Black bean it is collected when needed, storage is unnecessary as nothing eats it raw and it can be left in the stream till needed. It contains more energy than potatoes(but less than grain) and contains lots of starch and protein. This was a staple food of the rain forest people once. IMPORTANT EDIT: Always do an edibility test before consuming new bush foods. I left the Moreton bay chestnuts to soak in the running stream for a week (because I was busy) but it only takes 3 days to leach out the poison making it safe to eat. I estimate that 200 Moretonbay chestnut seeds alone would meet the energy requirements of an adult for 3 days. If you prepared this food on a continuous 3 day cycle it would be as follows: Collect fire wood, get the grated meal soaking in the stream from 3 days earlier, bake it into bread, collect 200 new seeds, bake them in a pit till soft, grate or slice them finely into the basket and put it back into the stream for 3 days. The bread made from this easily stores for 3 days. So you spend one day (probably only the morning) making the food and the other 2 days free for other activities.
The video shows the construction and use of a stone adze.To put this video in context, the dome hut you see in the video is in the same spot as the wattle and Daub hut is today- only 2 years earlier (first started filming these builds). I shaped the head from basalt using a hammer stone to roughly shape it (pecking) and a grind stone to polish it (grinding). I used an L shaped piece of wood to form the handle, carving a backrest to absorb the shock of each strike and lashed the stone to the handle using lawyer cane. I then cut down two trees and a sapling to demonstrate the time taken to use it (note-this land is an abandoned cane farm and not virgin forest). I would say that a stone adze is easier to make than a celt ax and is also quite effective at felling trees. The stone adze was the all purpose wood working tool in Papua New Guinea and favored over axes by most canoe building cultures. Later I discarded the adze, demolished the dome and built the wattle and daub hut without any previous technology I made- just to see if I could.
It has been raining here quite a bit in what should normally be the dry season. The wattle and daub hut is standing up well despite this (see video). However this has held back some other projects I had planned. So I decided to build a wood shed across the creek in Eucalypt woodland (where the best firewood is). Keeping firewood dry cuts down the amount of firewood needed and decreases the amount of smoke produced. Also keeping the firewood in an external structure saves room in the hut and leaves no place for snakes and rodents to hide. The shed is simply a 1 x 1 m thatched hut with a lower area used to store fire wood (1 cubic meter) and an upper level for storing fire starting equipment (fire sticks, tinder, stone blades for carving new holes in the sticks). I built it using wood from a previous hut to save effort and trees. It is tied together with lawyer cane and thatched with large palm leaves- These are a poorer quality than those in the mountain and will probably need replacement in a few months. I keep a large stone in front of the shed to break firewood over to save effort. Also while looking for fire wood I came across a fallen native sting-less bee hive. I ate some honey from it and stored it on the fireplace out side the hut. This keeps it sheltered from the rain, exposes it to morning sun to keep it warm and keeps it away from ants. In return perhaps the bees will produce honey (1 kg/year) and wax that I may use.
This is an old hut I built 2 years ago and have since demolished. It was a 2 m square floor with wattle and daub walls 1.5 m high topped with a pyramidal roof thatched with Alexander palm fronds. The building method is my usual plan- get a roof up first then build the walls. From start to finish it took 27 days (it could have been faster though- this was at a casual speed). This was the first wattle and daub hut I built and is larger than the other one I built later (my idea for now is to build small but well although I'll try larger huts again in future). The roof lasted for a few months before becoming rotten and bug eaten. As an important note the species of palm used in thatching makes all the difference. Had this hut been built in the mountain with wait-a-while palm fronds it would have lasted 2 years at least. Instead it was thatched with alexander palm fronds that deteriorated quickly. I wasn't to know this and was trying to adapt hut building practice I learned in the mountain to low land conditions (I've built similar huts up the mountain with the same roof shape that have lasted a long time). I hope in future videos to explore better roofing options to use in areas like this. Also of interest in the video is another pot I make showing more detail than previous videos. The fire place for the hut is a simple pit in the center of the floor. It is a good hut design though it requires a simple ladder to construct.
I built this tiled roof hut in the bush using only primitive tools and materials. The tools I used have been made in my previous videos. It should be pointed out that I do not live in the wild and that this is just a hobby. It should be obvious to most that this is not a survival shelter but an experiment in primitive building technology. To cut and carve wood I used the celt stone axe and stone chisel made in this video. To carry water and make fire I used pots and fire sticks made in this video. Finally, to store fire wood and dry, unfired tiles, I used the wood shed built in this video. The wooden frame was built with a 2X2m floor plan and a 2m tall ridge line with 1m tall side walls. 6 posts were put into the ground 0.25 m deep. The 3 horizontal roof beams were attached to these using mortise and tenon joints carved with a stone chisel. The rest of the frame was lashed together with lawyer cane strips. The frame swayed a little when pushed so later triangular bracing was added to stop this. Also when the mud wall was built, it enveloped the posts and stopped them moving altogether. A small kiln was built of mud from the ground and a perforated floor of clay from the creek bank. It was only 25 cm internal diameter and 50 cm tall. Clay was dug, broken tiles (from previous batches) were crushed and added to it as grog and it was mixed thoroughly.This clay was pressed into rectangular moulds made from strips of lawyer cane to form tiles. Wood ash prevented the clay sticking to the stone. 20 tiles were fired at a time. 450 flat tiles and 15 curved ridge tiles were made with only a few breakages. 26 firings were done in all and the average firing took about 4 hours. The fired tiles were then hooked over the horizontal roof battens. An underfloor heating system was built into one side of the hut to act as a sitting/sleeping platform in cold weather. This was inspired by the Korean Ondol or “hot stone”. A trench was dug and covered with flat stones with a fire
I installed a fireplace and chimney in the tiled roof hut. This is for for lighting and cooking. Heating is already taken care of by the underfloor heating system. I knocked a hole in the back wall and made it from the same mud used to build the hut. Some left over roof tiles were used as a chimney cap. I made same pottery too. Clay was dug from the creek bank, mixed with broken crushed tiles as grog and formed into a cooking pot and 4 large water pots. I burnished them (rubbed till smooth) with a snail shell and a seed pod making them stronger and more water proof. Then I fired them in the tile kiln. The kiln fired pottery was larger and stronger than my previous pit fired pots and also had a lower breakage rate with only one of the five pots breaking. I used the water pots to carry water from the creek to irrigate a sweet potato patch behind the wattle and daub hut (over the creek from the tile hut). The cooking pot was used to boil creek water. I used two different methods to show how to boil water: 1) in the kiln using it like a stove and 2) using pot boiling stones from the fire place. Boiling the water with rocks was faster than boiling a pot over a fire. Wooden tongs were made and rocks were put in the fireplace till they glowed red hot. The rocks were then put in the cold water in the pot. It only took 4 rocks to boil the water violently. This is probably the best method for sterilizing suspect water for drinking and could be done even without a pot (even a puddle next to a creek could be boiled this way).
A sling is a weapon used to fire rocks farther and harder than could be thrown by hand alone. I made this sling from bark fiber that I made into cord. The cord was then tied in such a way to produce an area in the middle with three cords. A strip of the same bark fiber was woven between these to form a pouch. A loop was tied at one end of the sling and a knot tied in the other. To use it, the loop is slipped over the finger and the knot is held down with the thumb. A stone is placed in the pouch and the sling swung over head. At the appropriate time the sling is swung forward in a throwing action and the knot held in the hand is let go. This causes the pouch to open and the stone to fly (hopefully) towards the target. I hadn't used a sling for eight years but the first target I set up and filmed, a potsherd on a stick at 10 m, was hit first go! Next I set up a log at 20 m and required more practice. Targets of potsherds and tiles at 10 m were set up in a clearing. Tiles on sticks at 15 m were set up in a stretch of creek. The last shots are back in the clearing at 10 m. Learning to use the sling is difficult and practice is necessary. When aiming line up the swinging plane of the sling with the target to determine Y-axis aspect and use release timing to determine x-axis aspect. With timing (right handed) too early and the stone will got to the right, too late and it will go left. Practice to make it go at the right time. Use larger stones as they swing slower and are easier to time. Use smooth stones so they fly straight and don't cling to the pouch when released. The advantage of the sling is that it's easy to make, portable and the ammunition (stones) are every where. The disadvantages are it's difficult to learn to use accurately, noise and movement give it away when used, it can't penetrate a target like an arrow (unless using some kind of weighted dart) and it can't be fired in thick forest. Interestingly, the sling has a range comparable to a bow. From m
I made 2 types of basket and a celt hatchet. The first type of basket made was a coil basket. Bunches of palm leaves where wrapped in thin strips of lawyer cane to for a coil. This was then coiled into a spiral with each coil being tied to the last to keep it in place. This was done by sewing a new section of coil to the previous one. The basket was given a flat base so it could stand up but could be made any shape. The second basket was made of lawyer cane. It started with thick strips of cane placed on the ground crossing in the centers to form an asterix shape. Importantly another half a lawyer strip was added so that the number of spokes the basket had was odd- even numbers don't work with this type of basket. The canes were tied together in the center with a strip of bark and a piece of cane was woven in a spiral around the spokes like a spider web. When the base was wide enough the spokes were bent up to form the vertical sides of the basket. The weaving continued up the walls to the top and the ends of the spokes folded down back into the basket. The coil method was very time consuming (about a week on and off) and made a heavy basket but used simple materials and had few gaps in it. Long grass could be used instead of palm leaves and any type of ties could be used to bind the coils. This type of basket can look very neat if done carefully (the one I made was rough). Also I would add that circular or rectangular mats might be made using this method and these materials. This might provide thick padding against the ground for sitting and sleeping and when finished could be rolled up and stored out of the way. The woven cane baskets were much faster to make (2 or 3 hours each including harvesting materials). They used fewer materials and were lighter too. I could have easily made them bigger but wanted them to fit through the narrow door of the tiled hut. The baskets will be used mainly for storing charcoal inside huts out of the rain but are also
I made a cord drill and then upgraded it to a pump drill. A cord drill is basically a spindle with a fly wheel attached so it looks like a spinning top. the middle of a piece of cord is then put into a notch at the top of the spindle. The ends of the cord are then wrapped around the spindle and then pulled quickly outwards causing the drill to spin. The momentum of the fly wheel causes the cord to wrap back around the spindle in the other direction. When it stops the cords are pulled outwards again and the drill spins in the other direction. I made the first one with a stone flywheel then made fire with it in the same way I make fire with fire sticks. Then I made and fired some clay fly wheels, made another drill with one of the fly wheels and fitted a stone drill bit to the end. This one I use for drilling holes in wood. I used the new drill to make a hole in a piece of wood. I then put the spindle of the original cord drill through the hole in the wood, tied the ends of the cord onto the piece of wood and it became a pump drill. The cords were wrapped round the spindle as normal but now a pumping action of the wooden cross bar created the same action. This was an interesting project. For fire making I'd stick to fire sticks because the equipment is easier to make. But for people with soft hands they could use the cord drill as it won't give them blisters. It should be added that the pump drill actually took longer than the cord drill (cord: 32 seconds, pump 1 min 30 seconds -the pump drill scene was edited down to make it watchable). The pump drill had more moving parts and was constantly having problems. As a fire making method I'd choose the cord drill over the pump drill unless all the parts were well made. The main purpose I'd use these tool for is drilling holes rather than fire making. It was reasonably good but the stone bits I made could be improved and their attachment to the shaft also needs some thought. If the bit loosens and gets off axis sligh
I made a batch of charcoal using the mound method then stored it in baskets for later use. Charcoal is a fuel that burns hotter than the wood it's made from. This is because the initial energy consuming steps of combustion have taken place while making the charcoal driving off the volatile components of the wood (such as water and sap). The result is a nearly pure carbon fuel that burns hotter than wood without smoke and with less flame. Charcoal was primarily a metallurgical fuel in ancient times but was sometimes used for cooking too. To make the charcoal the wood was broken up and stacked in to a mound with the largest pieces in the center and smaller sticks and leaves on the out side. The mound was coated in mud and a hole was left in the top while 8 smaller air holes were made around the base of the mound. A fire was kindled in the top of the mound using hot coals from the fire and the burning process began (the hot coals are being poured in the top using a small pot at Jump to 2:38). The fire burned down the inside of the mound against the updraft. I reason that this is a better way to make charcoal as the rising flames have used up the oxygen and prevent the charcoal already made above them from burning while driving out even more volatiles . I watched the air holes at the base of the mound and when the fire had burned right up to each opening I plugged them with mud. Once all 8 holes had be sealed the hole in the top of the mound was sealed with mud and the mound left to cool. From lighting the mound to closing up the holes the whole process took about 4 hours. The next day when the mound was cool to the touch (this can take about 2 days sometimes) I opened the mound. The resulting charcoal was good quality. Some wood near the air entries had burned to ash though these were only small twigs and leaves. This is the reason small brush is put on the out side of the mound, to be burned preferentially to the larger wood on the inside thus protectin
I made this bow and arrow using only primitive tools and materials.The bow is 1.25 m (55 inches) long and shoots 60 cm (2 feet) long arrows. I don't know the draw weight - safe to say greater than 15 kg (35 pounds) perhaps? The stave was made from a tree ,Northern Olive (Chionanthus ramiflora), that was cut with a stone axe and split in half with a stone chisel. One half was used for the bow and was cut to a length of 1.25 m (50 inches). The limbs of the bow were carved with various stone blades so that the limbs tapered in width, and to a lesser extent depth, towards the tips. The middle of the bow was narrowed in width to form a handle about 12.5 cm (5 inches) long. The string was made from the inner bark of a fibrous tree. It was separated into thin strips and left to dry. Then it was twisted into cordage. Arrows were made of the same wood as the bow and were 60 cm (2 feet) long. A notch was carved into the back to accept the bow string. They were fletched with bush turkey feathers picked up from the ground (no turkeys were harmed in the making of this video). A feather was split in half and cut into 3 lengths then resin and bark fiber attached the fletching on to the arrows. The tip of the arrow was fire hardened and sharpened to a point. The fletching was trimmed using a hot coal. Each arrow took about an hour to make. A quiver was made of bark to hold the arrows. Importantly, the quiver was worn on the back in the historically accurate style of native American and African archers- not on the hip like medieval European archers (see back quiver: https://en.wikipedia.org/wiki/Quiver). I cleared a shooting range with a semi rotten log as a target instead of a hay bale. At 10 meters the accuracy was better than 50 % for this narrow target and the arrows stuck into the wood enough so that they were difficult to pull out. The bow was durable, shooting about 200-300 times with the string breaking only 3 times. I made a back up string and repaired them by splicing
I made a rough type of textile from bark fibre. This is the same tree I use for making cordage though I don’t know its name. It has been raining a lot here lately (the video also shows how well the hut stands up to rain) and this caused a large wattle tree to fall down taking a few smaller trees with it. One of the trees was the type I use for fibre. So I stripped the bark from it and divided it into thinner strips back at the hut. I spun the fibre strips into a rough yarn using a drop spindle. The drop spindle was basically the spindle and fly wheel I used in the pump drill video I made a while ago. A small stick was tied to the top of the drop spindle to act as a hook to make sure the fibres spun. I tied bark strips to the spindle and spun the spindle so it twisted the strip. When one strip ran out a new strip was added and twisted into the thread. I then made a loom by hammering stakes into the ground and lashing cross bars to it. Stakes were hammered into the ground to hold every first string while a moveable cross bar held every second string. When the bar was lifted a gap was formed where every second string was above every first string. Then when the bar was dropped a gap was formed where the opposite was true. So in this way the weaving thread could be drawn through over and under one way and then under over back the opposite way. The alternative was to weave by hand which would have taken longer. Collecting, stripping and drying the fibre took a few days to do. Spinning and weaving took just over a day per 70 cm square. The result was a rough material about as stiff as a welcome mat. So at this stage I’m using them as mats. In future I will investigate finer fibres, such as those from banana stalks, as a possible material for cloth. They take more processing but produce a finer product. I may also make a permanent, portable loom that can be taken indoors when it rains.
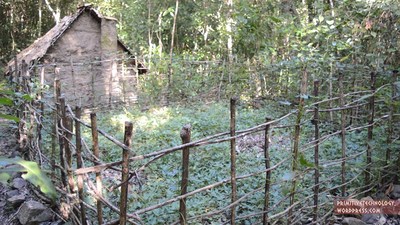
I built a fenced enclosure and cultivated sweet potatoes (from civilisation) and yams (from the wild) in it. I originally had a small 3X3 m garden behind the wattle and daub hut that already had some sweet potato and yam vines growing in it that were planted after the hut was built. But wallabies kept eating the leaves. So I made a wattle enclosure around it to keep them out. Wood ash was added to the soil to provide potassium and phosphorus for the growing tubers. The previous small garden was organised in rows (not seen in this video) but this was hard to water during dry weather. So I re-organised the patch into 1 meter wide mounds with pits in the centre. Vines were planted into the mounds and water poured into the centre of each mound watered the vines. So then I had a small garden with 9 mounds contained within it. I decided to enlarge the patch to fit in more mounds so I took out 2 sides of the fence and extended them by a meter each. So the patch ended up being 4X4m and contained 16 mounds. In addition to wood ash, leaf mould was added to the mounds for fertility and to reduce loss of moisture. The patch, being in the dark forest understory, received only about 2-3 hours of direct sunlight per day so the yield was disappointingly small. Nevertheless, the patch produced a few small sweet potatoes and a single larger yam. I also picked some green growing tips of the sweet potato vine that can also be eaten. I boiled the greens slightly in a pot with a hot stone and ate the leaves. I then roasted the sweet potatoes and yam in the coals of the fire. The sweet potatoes (purple fleshed tuber) taste sweet and starchy whereas the yam (white fleshed tuber) tastes similar to an ordinary potato. After eating, I took the wood ash from the fire and poured it back into the mounds that were harvested, replanted them and watered them. In future I’d plant the sweet potatoes in an area that receives much more sunlight in order to dramatically increase production. I’ve
I built this grass hut up on a ridge. It's roughly parallel with the tiled hut and wattle and daub hut that are a couple of hundred meters away down in a valley. I built it on a ridge to get away from mosquitoes in wet weather. This project took 7 days to make. I looked for a spot and cleared it on the first day, built the frame on the second, and spent the next 5 collecting grass. The type of grass is Guinea grass, an introduced species here in Australia meant for live stock. This grass is difficult to collect in this dry forest and I had to climb further into the mountain to get it. The design is a simple pointed dome that's easy to build. The tools used were simply sharp stones and a digging stick. It's 2.5 m wide and 2 m tall. 8 lawyer cane strips were driven into the ground to form the ribs of the structure and hoops of cane were put over this to attach the grass to. Vine was used to tie the frame together and to tie handfuls of long grass to it. When the hut was almost finished a cap was made and lifted onto the top of the dome to finish it. This hut is easy to build and houses a large volume. The shape is wind resistant and strong for it's materials. Gaps can be seen in the thatch but not if viewing from directly underneath meaning that it should shed rain well. A fire should be possible in the hut as long as it's small and kept in a pit in the center.The reason the hut took so long is due to the scarcity of grass on the hill. It could be built much quicker in a field.
I invented the Bow Blower, a combination of the bow drill and forge blower to make a device that can force air into a fire while being easy to construct from commonly occurring natural materials using only primitive technology. I began by fanning a fire with a piece of bark to increase its temperature. It is this basic principle I improved on throughout the project. Next, I made a rotary fan from two pieces of bark that slot together at right angles to each other to form a simple 4 bladed paddle wheel about 20 cm in diameter and 5 cm tall. The blades of the fan were not angled and were designed only to throw air outwards away from the axle when spun. The rotor of the fan was made by splitting a stick two ways so it formed 4 prongs. The fan was then inserted into the prongs and the end lashed to hold it in place. Spinning the fan rotor back and forth between the palms of the hands fanned the fire. But only some of the wind generated by the fan reached the fire. The rest of it was blowing in other directions, effectively being wasted. So I built a fan housing from unfired clay to direct the air flow into the fire. This was basically an upturned pot with a hole in the top, a spout coming out of the side. The housing was about 25 cm wide and 8 cm tall. The hole in the top and the spout were both about 6 cm in diameter so that the air coming in roughly equalled the air coming out. The base of the fan rotor sat in a wooden socket placed in the ground to make it spin easier and the top of the rotor protruded from the hole in the top of the housing. Now when the fan spun, air entered the hole in the top of the housing and exited the spout in the side. Importantly, it doesn’t matter which way the fan spins, air always goes into the inlet and out the spout. Air is thrown out towards the walls of the housing and can only leave through the spout while the vacuum in the centre sucks new air into the housing through the inlet. A separate clay pipe called a tuyere was made to
I built a tiled roof shed to provide a fire and rain proof shelter for working on projects during wet weather and for storing firewood. The shed houses the very kiln used to fire its own tiles. I cut timber using the stone hatchet and took it to the building site. 6 Upright posts were stuck into the ground about half a meter. Mortices were cut into the horizontal beams using a stone chisel to start with, then had there mortices enlarged using hot coals and a blow pipe to burn them out more. These beams were put in place and rafters were lashed on with lawyer cane. The wood that the tiles sit on are about 50 cm apart. The finished frame was 2 x 2 m in floor plan, 2 m tall at the ridge line and 1.5 m tall at the sides. This roof angle is about 22.5 degrees, half the pitch of the huts I usually make. This took about a week but I did it about 4 months ago and left the wood at the site because I was busy on other videos Next I made a kiln. I made a basket to make it easier to carry clay from the creek. I dug a trench for the firebox of the kiln and made a clay vault over it using stick arches to support it. Holes were put into the vault to let flames through. The kiln shape was a cube with a domed roof. It was made of mud on site (clay from the creek is too good to build a kiln with and is best used for pottery). Grate bars were put into the firebox to increase wood burning efficiency by letting air come up through the wood rather than over it. This only took about 3 days to build letting it dry slowly. To make the tiles, clay was collected and had the sticks and stones taken out of it. Then I crushed up old broken pottery and tiles I made before which I mixed with the clays as grog (stops clay from cracking). A tile frame was made from a split piece of lawyer cane bent into a trapezoidal shape about 50 cm long, 20 cm at the wide end and 16 cm at the narrow end. This was put on a flat stone. Wood ash was put down to stop the clay sticking to the rock. The clay was pre
A spear thrower is a simple tool that allows the user to throw a spear further than by hand alone. It is a small length of wood with a hook in the end that fits into a notch in the back of the spear. The extra power and distance gained by the thrower is due to the extra leverage it gives. I cut a small branch with a minor branch coming off the side. I shaped the minor branch into a spur to fit into the end of the spear. The thrower was about 65 cm long. For the spear, I cut a thin sapling approximately 2 m long and about 1.5 cm thick. I carved a cup in the end of the spear for the spur to fit into. Then I bound the back of the spear with bark fiber to prevent the wood from splitting. The head of the spear was simply charred in the fire and scrapped against a rock to sharpen it (during practice the head regularly breaks so only a sharpened tip is used to save work). To use the spear thrower, the spur of the thrower is inserted into the cup of the spear. The spear and thrower are held at about shoulder height. The thrower is quickly flicked forward and the spear propelled towards the target. As the spear leaves the thrower it bends slightly storing energy until it jumps of the spur. During flight, the flexible spear wobbles and oscillates paradoxically giving the spear some stability in flight. The throws in the video show what can be done in one afternoon of practice (my arm got sore and I wanted to start on other projects). I hit the target a few times at a distance 15 m. It is more powerful than a spear thrown by hand alone but is difficult to learn. The spear I made could have been a fraction lighter and so would have greater speed. Another improvement would be to add flights to the spear so it would be more accurate and fly straighter (like an atlatl). The extra energy gained from a Woomera's (Australian spear thrower) use has been calculated as 4 times that of compound bow (Wikipedia). It's easy to make (this took less than a day) but requires lots of train
I built a prawn trap from lawyer cane, sticks and vine. Then I caught some prawns and ate them. Prawn (and fish) traps are simple traps designed to catch aquatic life due to their shape. It consists of a simple basket with a funnel shaped entrance. Prawns easily find their way into the trap as they are funneled in, but have difficulty finding the way out. I wove the main body of the trap from lawyer cane then made the funnel from sticks with vines woven between them. The funnel was then inserted in the top of the basket and was complete. I put the trap in the water under some tree roots without any bait. About 10 minutes later caught the first prawn which I stored in a pot of water. I caught another one and made a fire. I humanely killed the prawn using the splitting method which destroys the central nervous system (boiling alive is more painful). Then I put them back in the pot with water. I collected some yams that I planted years ago from wild stock and put them in too. I took 5 hot rocks from the fire and put them in the pot boiling the contents. The prawns turned red after cooking. They were peeled and eaten. The yams were also peeled and eaten. This method of catching prawns is easy with the only skill needed being basketry. In practice, a long stretch of creek might have several traps collecting food each day without any effort on the part of the fisherman. Bait is not necessary to catch prawns as they will be naturally be drawn to the fish trap out of curiosity. But scraps from previous prawns may be used to bring in new ones (they are cannibalistic) or other fish like eels. The prawn trap is easy to build and can be reused many times. Edit: I originally called this animal a shrimp when technically it is a freshwater prawn. A prawns segments overlap the ones after it whereas a shrimps second segment overlaps the first and third segment. Shrimp have a distinct bend in the tail. It is definitely not a crayfish however which is basically a freshwater l
I built a bed shed, a small shelter with a sleeping platform built into it. It’s quicker to build than a large hut but can be extended later on when materials and time become available. It’s not far from the dome shaped grass hut I built earlier. The hut took about 2 weeks to make only because it's difficult to find grass in the mountain (if built in a field it would be significantly faster). The hut is 2 m long and 1 m wide. Four posts were hammered into the ground, two 1 m high posts (1.25 m long, 25 cm underground) on the low side and two 2m high posts (2.25m long, 25cm underground) on the high side. Onto this, a sloping rafters was lashed on with fish tail wait-a-while, a spiky palm with a vine like habit. To remove the needle like spikes from the plant, the leaves are pulled off so that the frond sheaths come with them. This made suitable lashings. Battens were then tied to the rafters and bundles of long grass from the mountainside were collected. Using vine from the bush, the bundles were lashed to the battens starting at the low side and continuing to the top so that the grass would shed rain. Cross bars were lashed to the frame of the shed at each end to support the bed. These were at a height of 1m above the ground. The bed frame itself was made from four poles (two 2m long and two 75 cm long) lashed together to form a rectangle 1.75m long and 75 cm wide (the ends of the two longer poles extending further to sit on the cross bars in the shed). Lawyer cane was then wrapped length ways over the frame to create horizontal threads. Then more lawyer cane was woven between these threads to form a sort of bed spring net. The bed frame was then put on the cross bars and tested to see if it could hold my weight. A mat I made from woven bark in a previous video was used for bedding and a bunch of grass for a pillow. In a rainstorm it was possible to make a fire in the space under the bed. This structure is quick and easy to build. The bed is 1 m above the g
In this video I build a garden to grow Cassava and yams, two staple food crops. Cassava is a shrub that develops large edible roots. Yams are a climbing vine that produce large, edible underground bulbs and smaller aerial bulbs on their vines. I had 5 huts, but the wattle and daub hut (from the first video uploaded on this channel nearly 2 years ago) became dilapidated. I abandoned it in favour of the other huts I built and neglected the roof. This let water in destroying a wall. Also, the sweet potato patch behind it had a tree fall across it destroying the fence. So I demolished them both to make one large garden. After removing the fence I set a fire under the fallen tree to burn it in half rather than spend the effort of cutting it with stone tools. After burning almost all the way through, it rained. So I came back later and cut through the rest of the log with stone tools. I eventually broke the tree in half. Using smaller logs as levers I moved the tree out of the garden clearing the space for the garden. I then collected wood and built a simple fence that was woven loosely together with vine. The fence needs only to discourage large animals from entering to prevent them causing damage. Most times pigs and wallabies don’t know that food is growing in the garden and won’t try and enter if they see no reason to. Or at least that worked for the sweet potatoes so we’ll see if it works this time. For the yam and cassava planting material I travelled far down stream to the site of my old stone hut that I built over 10 years ago. It had a corbelled dome roof that was damaged when a tree fell on it during a cyclone and it came down a few months later. The thick walls however have stayed standing for about a decade though. Yams and cassava grew wild at this site which is one of the reasons I built the stone hut there. These plants are not native to Australia but grow wild here after having escaped from people’s gardens (similar to how wild pigs live her
I built this pottery kiln and some pottery from termite mound clay to test an alternative clay source to my usual one from the creek bank. I started by making a large grate from ordinary clay. It was just under 50 cm in diameter. Next, I took dry chunks of termite nest and put them into the pit in front of the tiled roof hut. The chunks were crushed and water was added to slake the clay. The clay was trodden on to mix it. Dead palm fronds were added to the clay to stop it from cracking as it dried and to add insulation to the kiln. The mixture was trodden on again and then taken from the pit. A trench was dug to form the firebox of the kiln and a wall of clay was made in the front of the trench. A hole was dug into the wall to allow air flow into the firebox. The grate was placed on top of the firebox and the walls of the ware chamber were built around the grate. When the kiln walls were finished, grate bars made from termite clay were placed into the firebox. Grate bars are important for fireboxes as they lift the firewood off the ground allowing air to move up through the fuel bed for more efficient combustion. Burning wood as a heap on the ground allows cold air to flow up and over the coals, cooling the kiln and leaving the air unreacted with the fire wood. It still works but is much less efficient than using grate bars. The finished kiln was 50 cm tall (above grate height), 50 cm in diameter and with walls about 12.5 cm thick. The pit/firebox was about 25 cm deep and 25 cm wide with grate bars sitting half way between the ground and the circular kiln grate above. Next, for the pottery clay, I selected a termite mound built on red clay soil. I took it to the kiln area and slaked it with water and mixed it in a small pit. I crushed up an old grate from a previous kiln and mixed it into the termite clay as grog. Grog prevents pottery from cracking as it dries and helps prevent breakage when firing. I then shaped the clay into a small urn. I also made some barre
I built a water powered hammer called a “Monjolo”. I started by making a water spout from half a hollow log to direct water from the creek. This was set up in the creek and water flowed through it. The hammer was made from a fallen tree. I cut it to size by burning it at the points I wanted it cut (to save effort chopping). Next I carved a trough in one end to catch falling water. This was done first with a stone chisel that was then hafted to an L–shaped handle and used as an adze. This adze only took about an hour to make as I already had the chisel head and cordage made of bark fibre to bind it with. To save further effort carving I used hot coals from the fire to char the wood in the trough. I put the coals in using “chopsticks” (unused arrow shafts) to transfer them from the pit. The coals were fanned or blown with a wooden blowpipe till the wood in the trough burned. Then the char was scraped out. The sides of the trough were sealed with clay to make sure the wooden sides did not burn away which would effectively decrease the volume of the trough. This was approximately 8 hours work over two days. With the trough carved I made a hole in the middle of the log as a pivot point. Using the same char and scrape method I burnt a hole right through the log using hot coals and a blow pipe. Again clay was used to prevent wood burning where it was wanted. To burn through the approximately 25 cm diameter log it took about 4 hours and 30 minutes. Another hole was burnt in the end to fit the wooden hammer head and it took a similar amount of time. A tripod lashed with loya cane was set up at the water spout. The axel of the hammer was tied to one leg, the hammer fitted onto the axel and the other end of the axel tied to another leg. The trough was positioned under the waterspout to collect water and the tripod adjusted so that the resting point of the hammer was horizontal (so water wouldn’t prematurely spill out of the trough). The trough filled with wate
Charcoal is a valuable fuel that reaches a higher temperature than the very wood it’s made from. I’ve made some before, but with supplies running low due to furnace experiments, I decided to make another large batch of charcoal in a mound. I stacked the wood into a roughly conical shape (about 1 m wide and 75 cm high) and then built a thick wall of mud around the heap (this took 6 hours). Eight air entries were made in the base of the mound and one air exit hole was left at the top of the mound to allow the volatile components of the wood to escape while creating a natural draft to keep everything burning. The mound was lit and the flame burned backwards down the heap in the opposite direction to the draft. This protects the coal made above the level of the fire from burning as carbon dioxide rushes past instead of oxygen, preventing combustion of charcoal. Each air entry was sealed only when fire became visible through them. This is an easy way to tell when to close them up, i.e. when the fire had burned down all of the wood in the heap. When the last air entry was closed, the air exit at the top of the mound was sealed, 5 hours after starting. The next day when cool, a large arched opening was made in the side of the mound to extract the charcoal. Despite a few unburnt brands the yield and quality was good filling almost 2 baskets. To see if the kiln was reusable, I restacked it with timber cut from a fallen gum tree branch up the mountain. Due to the difficulty in reaching into the mound I stacked the wood in criss-crossed horizontal layers. The opening was sealed with mud and the mound lit as before. This time the mound burned quickly and I had to seal it early as the timber was burning at different rates, 3 hours after starting. Some large logs remained unburnt while charcoal that had already formed started to burn up being wasted as ash. When I opened it the next day it had still produced an ok amount of charcoal but was disappointingly low compared t
I made a pair of sandals from loya cane. Walking bare footed in the bush generally doesn't cause problems for my feet. But when repetitively carrying loads of various materials the soles of the feet become cracked and split. So I made some basic footwear for the purpose of working on rough surfaces. I cut some cane and measured out a length 6 times the length of the foot (about 1.5 m), folded it into loops and wove more cane between the loops to form the sole, adding new cane as needed. Next, I made bark fiber cordage and threaded it through the sandal to keep it on. The pair took about 1 hour to make (longer due to setting up the camera). The sandals do protect from the ground, preventing the feet from cracking. I personally don't like wearing footwear in the forest as bare feet give better grip, especially on inclines. But for heavy work or when my feet are injured I'll wear these. These sandals are so quick to make that I've already got 2 pairs. The material used to make them (loya cane) is everywhere here but pretty much any rope like material will do. Bark fiber rope, grass, vine, flexible roots etc. will all make usable alternative materials.
The purpose of this project was to test a simplified blower design connected to a furnace. I purposely did this to show that people in most natural environments should be able to replicate this design without difficulty. This blower differed from the previous one in several ways to simplify the construction method. Firstly, the impellor was simply a stick as a rotor with a 40 cm wide rectangle of bark tied into a split in its end with a bark fibre cordage. A stone with a pit carved into it acted as a socket for the lower half of the rotor to spin in. If spun in the dirt the rotor can drill down and the position of the impellor can reach ground level causing the blades to bump into rocks and dirt. Later, I plastered the stone socket into the ground with mud to hold it securely in position (not shown in the video, just be aware of this solution if the socket shifts around too much). Secondly, the housing for the blower was made in situ of ordinary mud (dirt and water on site). It was a bit more than 40 cm in internal diameter. The walls of the housing were solid mud and the roof was made of sticks covered with mud. An opening more than half the length of the impellor was left in the roof to remove the impellor for maintenance and to admit air into the blower during operation. In use, the portion of this opening near the front of the blower was covered with a tile. If left opened the blower still worked but covering it improved performance by preventing air escaping near the front. In places where water is not available, a housing shaped pit covered with sticks and dirt might work instead. Finally, a simple length of cordage was used to drive the rotation of the impellor. This cord was placed in a notch carved into the top of the impellor rotor. The cord was wrapped around the rotor about 2.5 times. During operation the cords were pulled outwards causing the rotation. When fully unwound, the momentum of the impellor then wrapped the cord back around in the other dir
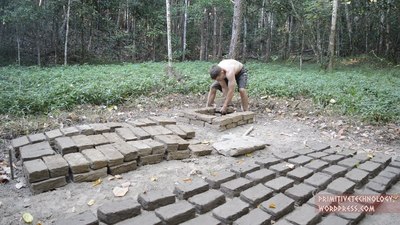
I made a brick mold that makes bricks 25 x 12.5 x 7.5 cm from wood. A log was split and mortise and tenon joints were carved using a stone chisel and sharp rocks. The mold was lashed together with cane to prevent it from coming apart when used. Next, I made a mixture of mud and palm fiber to make the bricks. This was then placed into the mold to be shaped and taken to a drying area. 140 bricks were made. When dry, the bricks were then assembled into a kiln. 32 roof tiles were then made of mud and fired in the kiln. It only took 3 hours to fire the tiles sufficiently. The mud bricks and tiles were a bit weaker than objects made from my regular clay source because of the silt, sand and gravel content of the soil. Because of this, I will look at refining mud into clay in future projects instead of just using mud. Interestingly, the kiln got hot enough so that iron oxide containing stones began to melt out of the tiles. This is not metallic iron, but only slag (iron oxide and silica) and the temperature was probably not very high, but only enough to slowly melt or soften the stones when heated for 3 hours. The kiln performed as well as the monolithic ones I've built in the past and has a good volume. It can also be taken down and transported to other areas. But the bricks are very brittle and next time I'd use better clay devoid of sand/silt, and use grog instead of temper made of plant fiber which burns out in firing. The mold works satisfactorily. I aim to make better quality bricks for use in furnaces and buildings in future.
I built a natural draft furnace to test ideas about how hot a furnace could get without the use of bellows. Natural draft is the flow of air through a furnace due to rising hot air. The hot gasses in the fuel bed are more buoyant than the cold air outside the furnace causing them to rise. Fresh combustion air then enters the base of the furnace to replace the rising combustion gasses, keeping the fuel bed burning. This effect increases with: 1. the average temperature of the fuel bed relative to the outside air and 2. The height of the furnace. Two other important factors are the size of the tuyere (air entry pipe) and lump size of the fuel bed as these effect the resistance to airflow through the furnace. The furnace was tested with wood fuel and some ore was melted but produced no iron. High temperature were indeed produced (probably about 1200 c). These types of furnaces were once used for smelting copper and iron ores in around the world in ancient times, usually using charcoal as a fuel and in some cases wood too. I designed the furnace using a formula from the book “The mastery and uses of fire in antiquity” by J.E. Rehder. It was designed to have a space velocity (air speed within the furnace) of 6 m per minute which is recommended for iron smelting. The furnace was 175 cm in total height but with a height of only 150 cm above the tuyere. The height between the air entry and the top of the furnace is what determines the strength of the draft, the space beneath the air entry is not included in the formula. The internal furnace diameter was 25 cm. The walls were about 12.5 cm thick at the base but got thinner with height. The tuyere (air entry pipe) was 7.5 cm internal diameter and about 20 cm long. The tuyere was placed into an opening in the base of the furnace and sealed with mud. The whole thing took about a week to make due to the slow drying time that was assisted by keeping a fire burning in side it. The furnace was designed to use charcoal (which i
I bought a new property to shoot primitive technology videos on. The new area is dense tropical rainforest with a permanent creek. Starting completely from scratch, my first project was to build a simple dome hut and make a fire. First, I took some wood, Abroma mollis, for fire sticks. I knapped a small stone blade and used it to strip the fire sicks. Palm fibre was then taken for the tinder. The fire stick kit was then placed under a palm leaf to keep it out of the rain. Next, a stone from the creek was fashioned into a simple hand axe. This was used to cut a staff that was used to clear a path to the hut location. The location for the hut was a clearing densely crowded by native raspberry. This was then cleared using the staff and a small 2.5 m circle was levelled ready for building. Eight 2.75 m long saplings were cut using the hand axe and brought to the site. Eight holes about 25 cm deep were hammered into the ground in a circle 2.5 m in diameter and the saplings were then planted in. The tops were brought together at the top and tied with vine. A door lintel stick was lashed to the front about 75 cm off the ground giving a low door way. A stone flake was used to cut about 600 palm fronds. These were split and lashed horizontally to the frame creating a thatched dome. Mosquitoes are a real problem here so a fire was lit. The fire sticks from before had a hole carved in the base boards and had a notch carved to let the powder pour out. The spindle was twirled in the socket and smoking powder poured out producing a hot coal. This then ignited the palm fibre tinder. The fire was transferred to the hut and a small hearth was made of stones. The fire makes a big difference in the number of mosquitoes which seem unable to tolerate the smoke. The dome was completed up to the top and a small cap was made from lawyer cane and fronds to place on the top to keep rain out. When not in use the cap can be removed to let in more light like a sky light. Finally wood wa
I made some pottery from the clay in the new area to see how well it performed. A large bank of clay was exposed by the side of the creek. I dug it out using a digging stick and took it back to the hut. Small sticks and stones were picked out of the clay and the whole mass was mixed to make sure there were no dry lumps. When this was done the clay was then left next to the fire to dry slightly so that it became a stiff workable material to form pots from. No further processing was done to the clay. I formed small pinch pots from the clay by taking balls of it and pinching out the shape of the pots. Small cracks that formed while shaping were simply mended by wetting and smoothing over. Several pots were made this way. They were then left to dry completely next to the fire until they were completely dry. To fire the pot, it was placed upside down in the hot coals and covered with sticks in a tipi fashion. The wood both acts as fuel and protects the pot from sudden changes in temperatures such as those caused by sudden winds. When the fire was burning well, I increased the temperature of the fire by fanning it with a fan palm frond. The pot glowed red hot amongst the coals and so was fired to a sufficient temperature. After waiting overnight, the pot was retrieved from the ashes and struck with a stick. The pot gave a clear ringing sound indicating it was strong and had no cracks (hollow sounds indicate the opposite). Now I had a small bowl to carry water in. A larger pot was then made from the same clay. This time the walls of the pot were built up using the coil technique where long rolls of clay were rolled and then squashed onto previous layers. The last layer was pinched outwards to form a pot lip. A lid was made for the pot by making a flat disk of clay with a small handle for lifting. When dried the pot was then fired as before but in a larger pit outside the hut. Again, the pot was covered with wood protecting it from sudden breezes that might cool or hea
I built an A frame hut as a large work space for projects. First I made a celt hatchet to cut timber for the hut. The axe head was made of amphibolite and the handle was made of a species of wattle. For the hut the floor plan was 4 X 4m. The height of the ridgeline was 2 m above the ground. +A post was planted in the ground to support the ridge pole at the back of the structure and an A frame was put in the front to support the ridgeline. The rafters of the hut were then attached to the ridgepole. Palm fronds were then collected, split and lashed to this frame. The dome hut was disassembled and its thatch was added to the structure. Approximately 1200 fronds were used in total. For the ridgeline, thatch was lifted in place and rested on without lashing it down. Instead, pairs of sticks lashed together were lifted in place sitting over thatch preventing it from blowing away. These are known as “jockeys” as they resemble a rider sitting on a horse. A wall of wattle and daub was built at the back of the structure. Wooden poles were planted into the ground and lawyer cane was woven between them. Soil was dug from around the hut forming drainage trenches while also supplying the mud used to daub the wall. No fibre was added to the daub, just straight mud. Pegs were stuck into the wall to form a convenient rack to hold the stone axe off the ground when not in use. Later, pegs were added to support the fire sticks too. A bed was made by hammering in wooden stakes and lashing timber to the frame. This was covered with palm fibre to act as bedding. Atherton oak nuts were then collected and eaten/stored in a pot. Latter, heavy rain fell testing the huts ability to shed rain. The hut stayed dry while the water flowed off the thatch and into the drainage trenches left over from digging the mud for the wall. The A frame hut is a simple shelter that can be built quickly and simply. It’s basically a large roof built directly on the ground. The shape is strong and should re
At the old hut site (the new one being temporarily cut off by flooding) I made lime mortar from the shells of rainforest snails by firing them in a kiln, slaking them in water, mixing them into lime putty. Limestone is basically calcium carbonate (CaCO3). The general source of lime is limestone and various other calcareous minerals, though shells, egg shells and coral are other sources of lime (for more information see video on Corporals Corner channel: https://youtu.be/tOhAfaFboNU). When heated above 840 degrees Celsius, the lime decomposes into calcium oxide (CaO) or Quicklime and releases carbon dioxide (CO2). When water is added to the quicklime it becomes calcium hydroxide Ca (OH)2 or lime putty. From here the calcium hydroxide can then be shaped into a form and allowed to set. Carbon dioxide enters the lime putty as it dries causing it to turn back into calcium carbonate. The new calcium carbonate has then set, remaining solid and water resistant. In my local geography, calcareous rocks such as limestone are absent leading to a difficulty in acquiring the feed stock for lime making. However, I was still able to make lime by collecting the shells of large terrestrial snails that are native to the rainforest here. The unoccupied shells of these snails were gathered up and stored at the hut. Fire wood was gathered and packed neatly into the kiln. Importantly, the firewood was stacked on top of the grate rather than underneath it in the firebox as is the normal procedure for firing pottery. Using an ordinary updraft pottery kiln in this configuration allows it to reach much higher temperatures than would be possible during normal use. The wood was lit from above and the fire burned down towards the grate. Alternate layers of shells and wood were added on to this burning fuel bed. After adding the last layer of wood to act as a “lid” to prevent heat loss from above I left the kiln to finish on its own, unsupervised. The whole process took about an hour and a
I built a round hut using palm thatch and mud walls to replace the damaged A-frame hut built a few months ago. The A frame hut was damaged due to torrential rain and poor design elements considering the wet conditions. The thatch had rotted in the part of the roof that gets shade. Moth larvae and mold grew and consumed the thatch in these places. The hut also tilted forward due to the back post being hammered in only 25 cm into the ground. So on returning to the property (it was cut off by flooded bridge) I began work on a new hut. The new hut was positioned further into the open clearing to get more sunlight. A 3 meter diameter circle was scribed and 12 wooden posts were hammered into the ground, each 50 cm deep for a sturdier structure. Lintels were then tied to the top of the posts joining the posts together. A tripod ladder was made from poles lashed together at the top and a platform lashed to its frame. The roof poles were then attached to the top of the lintels and lashed together at the top to form a conical roof frame, 3 meters at the highest point. Loya cane was then tied on the eaves to act as support for the ends of the palm thatch. 700 palm fronds were then cut split and thatched onto the roof. The tripod ladder was used to climb up and thatch the roof from the inside. A cap was then made to put on the very top of the cone when the roof was almost finished. A drainage moat was dug around the hut and the excavated soil was placed on the hut floor to raise its level above the damp ground. A deluge tested the hut’s water shedding abilities. Torrential rain fell while a fire was kept going inside the dry hut. The drainage moat flowed like a stream during the heavy rain event. Loya cane was then harvested and woven between the posts. This formed a low wall. It was then daubed with mud inside and out. The clay from this was taken from the drainage moat. Rain falling into the moat meant that water didn’t need to be collected from the stream to mix th
I made a blower and some charcoal at the new area in order to create higher temperatures in for advancing my material technology. I took Fan palm leaves and fashioned them into an impellor (about 25 cm in diameter) held in a split stick as a rotor. I then built a housing from clay (slightly more than 25 cm diameter with inlet and outlet openings about 8cm in diameter) and assembled the blower. I opted not to make a bow or cord mechanism as I’ve done before due to the complexity and lower portability of such a device. The lighter impellor material (leaf instead of the previous bark) made it easier to spin by hand anyway as it has a lower momentum. Each stroke of the spindle with the hand produces 4 rotations, so about 2 strokes per second gives 480 rpm. The blower increases the heat of a fire when blowing into it and I would guess it’s more effective than a blow pipe and lungs but don’t how it would compare to a primitive pot or bag bellows for air supply. A small furnace was made and then fired with wood fuel. The wood was wet but managed to fuse and partially met sand in the furnace. To get better performance, I made charcoal from the poor quality wood. I made a reusable charcoal retort to make it. This was different from the previous reusable mound I built as it consisted of a mud cylinder with air holes around the base. To use, it was stacked with wood and the top was covered with mud as opposed to the previous design which had a side door. The fire was lit from the top as usual and when the fire reached the air entries at the base (after an hour or two) the holes were sealed and the mound left to cool. The top was the broken open the next day and the charcoal removed. Another batch was made using significantly less effort as the main structure of the mound did not need to be rebuilt each time, only the top. Iron bacteria was again used to test the furnace. Charcoal and ore was placed in the furnace and the blower utilised. After an hour of operation the
I planted a yam in a large basket like enclosure and then 6 months later harvested, cooked and ate it. My previous attempts at growing yams were stymied by wild pigs and scrub turkeys. On learning that yams are in the area, these animals will seek out any tubers planted and eat them. So my solution was to build a large basket like enclosure to protect the growing vine. 13 wooden stakes were hammered into the ground (an odd number being important in any weaving project) and lawyer cane harvested from the forest was woven between these uprights. The basket was about 1 m in diameter and about 75 cm high. A large yam, partially eaten by wallabies from a location further down the creek, was dug up and carried to the site. A small pit was dug in the enclosure and the yam simply placed in it. The enclosure was then back filled with dead leaves for fertiliser. As time progressed the vine grew above the basket and a long pole attached to it so it could climb into the canopy making full use of the sun. After 6 months and no maintenance, weeding or watering the yam had grown into two large tubers whereas the original yam had rotted away leaving a thin husk. The new tubers were dug up using a digging stick. As carful as I was, the yams sill broke off with more tuber still under ground. This portion will probably strike next season anyway. In the canopy, the vine also produced smaller tubbers called “bulbils”. These were collected in a pot to be used as seed yams for a larger garden I’m planning. You can eat bulbils as well but the larger yam is generally eaten instead due to its larger size. To cook the yam a fire pit was dug about 30 cm in diameter and about 20 cm deep. Wood was piled above the pit and set alight. The hot coals then fell into the pit where rocks where added to retain heat. The coals were scraped aside and the large tuber was broken up and thrown on top. The coals were raked back over it and a fire started on top. This cooked for 30 minutes before be
I developed an experimental cement from made only from re-fired wood ash as its cementitious material. It was mixed with crushed terracotta as an aggregate and formed into a cube. The cement set hard after 3 days and did not dissolve in water after this period. Process: First I burnt bark and leaves in a kiln at high temperatures to produce well burnt, mostly white wood ash. The ash was then mixed into water and stirred well. The excess water was poured off and the resulting paste was made into pellets and allowed to dry. A pellet was then re-heated in the forge until it glowed about orange hot. This was then taken out, cooled and dropped in a pot of water. The pellet dissolved and boiled due to a chemical reaction with the water. The paste was stirred and crushed terracotta (old tiles from previous projects) was added and mixed to form a mouldable mortar. This was formed into a cube and allowed to set for three days (in the video, a cube made exactly the same way 3 days previously was used due to time constraints). The resultant cube was strong and made a slight ringing sound when tapped with a finger nail. It was placed in water for 24 hours to simulate a very heavy rain event and did not dissolve or release residues into the water. My current theory: The main component of wood ash consists of calcium in some form (e.g. calcium carbonate, calcium oxide). This can be up to 45% from my research. Calcium is in higher concentration in the bark and leaves of a tree. When the ash is mixed with water, the soluble component of wood ash (10% pot ash) dissolves into the water. But seeing that it does nothing for the cementing process, it is drained off leaving the insoluble calcium (and other components) in the paste. Doing this probably raises the relative percentage of calcium in the paste to about 50% or more. Most of the other 50 % consists of silica and alumina which are pozzolans, materials that chemically react with calcium hydroxide to increase the durability of
I smelted iron bacteria in a short furnace and produced a small quantity of iron prills (small iron spheres). In my ongoing quest to reach the iron age, further experiments were conducted concerning furnace design and the treatment of ore. I began by making a very short furnace. A pit 25 cm wide and 25 cm deep was dug and the tuyere of the forge blower placed in a 15 degree downward angle into the pit. Onto this, a furnace stack made of mud and grass was built 25 cm above ground level. The furnace was fired at various stages to help dry it. It took less than a day to build. Eucalyptus wood was collected dead off the ground and stacked into a re-useable charcoal mound I had made previously. The top was sealed with mud and the mound lit. It took about 2 hours 30 minutes for fire to reach the air entries, at which time the holes were sealed and the top closed with mud. Iron bacteria from the creek was gathered and brought to the smelting hut for processing. Charcoal was ground into a powder and mixed with the ore and water in the proportions of 1:1 char to ore by volume. This mixture was formed into 59 pellets 2.5 cm in diameter and then dried on top of the furnace. To make the smelt, a wood fire was made in the furnace and allowed to burn for about an hour by natural draft and blowing. When the wood burnt down to the tuyere the furnace was filled with charcoal and 10 pellets were added to the top and the blower was engaged. Three handfuls of charcoal and 10 pellets were added at about 7 minute intervals totaling about 42 minutes. Charcoal was then continuously added after the last charge until the basket was empty. It took a total of about 3 hours working the blower until the operation ended. The mass of slag and iron prills was prized out of the furnace using a log and wooden tongs. It was hammered flat while hot but no large bloom was made. Instead many small iron prills were found. These mostly seemed to be cast iron. So far this is the largest amount of iro
While I’m working on other projects I’ll put up this video of an experimental furnace I built that operates by natural draft and uses charcoal as a fuel. The furnace burns the fuel on a grate for maximum area of air entry. The chimney attached to the furnace is 2 m tall above ground level. The pit is 25 cm cubed and extends below ground level. The whole structure took about 2 weeks to build. A brick of iron oxide (from iron bacteria) mixed with charcoal powder was made and placed in the furnace sitting on a grate about 12.5 cm tall. The furnace was lit with wood and fired. Charcoal was added after this point and a high temperature was reached. The ore brick melted and produced some tiny beads of cast iron. In contrast to the other furnace I made in the previous video, this one produced less iron while consuming the same amount of charcoal. I’d actually built this furnace before the previous video in an attempt to reduce labour by having a tall draft chimney replace the work and complexity involved with using a blower. I’ll keep experimenting with natural draft furnaces, the principle is sound but the method of introducing the ore (batches of ore on a grate instead of continuous addition of ore pellets) is probably inefficient or could be improved on.
With the wet season here, it's time to plant this years crop of yams. The previous yam garden, a large basket type enclosure, worked well in discouraging predators from eating the growing tubers. But with time the cane enclosure rots. So I switched to a method of protecting yams by planting the seed yams under a pile of rocks. Early tests prove that this method protects them from being eaten. The rocks are too heavy for scrub turkeys to lift and wild pigs seem not to associate the pile of rocks with food. So the next step was to make a garden consisting of individual mounds fortified with neat stonework. This was done by building layers of stone circles around the mound while adding soil with each layer. A yam bulb was planted in each mound during this process. A wooden stake was placed in each mound for the yam vine to grow up and horizontal rafters were tied to the top of these stakes to give the vines something to grow across. By the end of the project the yams had started growing with some coiling around the stakes.
With the wet season at it's peak, a shelter was needed to keep tools and materials dry as well as providing a dry work-space for future projects. So after some procrastination, I decided on a low roof design. A 2.5 m by 2.5 m hut with a ridge 2 m above the ground and side walls 75 cm high. Upright posts were put in at about 60 cm intervals along the 3 walls. The front was left open as this is more of an open workshop than a dwelling. Grass was collected from high up in the hill as it will not grow in the darker, lowland forest. Carrying the thatch to the hut was the most labor intensive part taking approximately 36 hours over the course of more than a week. The walls were then coated in soft, grey mud from a nearby clearing. The floor was coated in the same material. A large amount of rain fell due to a nearby tropical cyclone passing to the north. Despite this there were only a few leaks (mainly on the ridge line) that were subsequently patched with more grass. A fire was then lit with fire-sticks despite the damp conditions. This was done to help dry the mud walls and floor. The end of the video shows the yam mounds behind the hut doing well from of the torrential rain. The shelter will suffice for the remaining two months of rain that is expected to fall.
I made some fired clay bricks as an experiment to see if I could make a permanent, waterproof, building material. A brick mold was fashioned from clay and then fired in existing kiln. This was then used to make bricks formed from clay from the creek bank. These bricks were then stored in the hut I built last episode to dry. Using half the hut I could fit 40 bricks. These, when semi dry, were then stacked around the fire to dry out. A small kiln was then assembled from un-fired bricks and used to fire 4 bricks as an experiment. It was about 50 cm tall and 25 cm square in cross section. The fired clay bricks were water resistant, they didn't dissolve when submerged in water. I will use these bricks to make a larger kiln and hopefully larger huts later on. I estimate that a kiln with a 50 cm cube ware chamber could hold 40 bricks without being so cramped the flames can't get through. The good thing about using bricks to make kilns is that they can be constructed quickly without waiting for the layers to dry, they only crack along the joints between bricks while remaining structurally stable, they can be disassembled and built elsewhere or they can be reconfigured/enlarged to make different types of kilns. Repairs are also possible too.
I gathered polynesian arrowroot, grated it, extracted and dried the starch and cooked it into gelatinous, pancake shaped food that tasted like rice noodles. Polynesian arrow root is a plant in the same family as yams but with a different growth habit. It has a single, branching leaf and a single tuber below ground. They were brought to Australia about 7000 years ago as one of the "canoe" plants carried by Polynesian seafarers and grow wild in the hills near my hut to this day. The tubers are rich in starch but have a bitter compound that needs to be leached out with water to be made edible. This same compound is traditionally a medicine in small quantities for treating a range of illnesses from gastrointestinal upset to snake bite. I dug up the tubers which took about 3 minutes to do per plant, yielding one golf ball sized tuber each. These were then washed and grated into a pot using a roof tile. The resulting mash was mixed with water and allowed to settle. The white milky water was then scooped into a second pot and the starch was allowed to settle. The water was then poured off and more starch water was tipped in. At this stage the starch was still bitter, so it was mixed with water, allowed to settle and the clear water above was poured off several times removing this bitterness. When it tasted good, the paste was put onto a tile to dry over a fire. Some of it cooked and became small rubbery pieces of starch. The dry flour was stored in a pot. Some of this was then mixed into a paste and cooked on a tile like a pancake. It turned clear when cooked and has a rubbery texture. It tasted just like a rice noodle which is unsurprising considering the ingredients are nearly the same. Starch is the largest carbohydrate in the human diet. Polynesian arrowroot starch contains 346 calories per 100 g (wheat contains 329) and so the discovery of this staple food is fairly significant. It can be stored indefinitely if kept dry and away from weevils or can be stored as live
I built a cross draft kiln and fired a pot in it to test ideas about how cross draft kilns operate. A cross draft kiln is one in which the flames travel from the firebox and across a horizontal wear chamber before traveling vertically up a chimney and out of the kiln. Unlike an updraft kiln there is no perforated floor that the pottery sits on. Instead the pot sits on the floor of the wearchamber as the flames pass around it. Taking soil from a previous kiln and mixing it into mud, I formed the kiln so it was less than a meter long. It was 25 cm wide and tall inside the tunnel formed by the kiln though a slight curve was added to the tops of the side walls. The walls were covered with sticks and a roof of mud was put in place onto this. A chimney about 25 cm wide and 65 cm in total height was made at the end of the kiln to draw flames through the kiln due to natural draft. 5 grate bars made of clay were installed in the firebox to make combustion more efficient. A side door was cut into the kiln to access the ware chamber (25 x 25 cm). Clay was taken from the creek bank and mixed with previous crushed pottery as grog. It was formed into a pot with a pouring spout. This was dried and then placed into the kiln. The kiln was fired with the flames acting as planned and the pot was fired in a relatively short 1 hour and 20 minutes. It would have been a shorter firing time had the kiln not still been wet. The pot was tested with water and held it satisfactorily. Cross draft kilns are an apparent improvement on updrafts with the reasoning being that more efficiently retain heat as the hot gasses don't immediately exit the kiln leaving the colder gasses inside. Hot spots are less likely to develop giving a more uniform firing of the pottery. Cross draft kilns developed early in Asia, evolving from the practice of excating tunnels into the side of hills to fire pottery. It's unknown whether the European cross drafts were adopted from the east or were the result of the g
My hut burned down after I left a fire untended in it. I needed a new one quickly. Fortunately I had already cleared a new spot earlier in the wet season for such a purpose. I constructed the new hut from wood and palm thatch. It was 3 x 3m in floor plan and a total of 3m high with 1.5m high side walls. 4 posts were put into the ground and a pyramidal roof was built on top of this. The frame was then thatched with palm fronds (which are less flammable than grass thatch but don't tend to last as long in wet weather). After finishing the hut I collected the possessions from the last hut and moved them into the new one. Yams from the garden were dug up but there weren't many due to the soil being compacted and low in organic matter. A yam was cooked by wrapping it in clay and baking it in the hot coals for 30 minutes. Now I have a larger hut where I can continue to make projects despite the minor set back that has just occurred.
I made clay bricks, air dried them and then built a dry stacked (no mortar) wall from those bricks. Brick making is a time consuming process. To amass enough bricks for a large scale firing will take a long time to do. In the previous hut (that burnt down) bricks were stored inside the hut out of the rain to dry before firing. This took up considerable space within the hut. So with this hut, bricks were stored under the eves of the hut forming a temporary wall around the work space. Clay was taken from a pit and carried to the hut site. The clay was mixed with water in a pit. The ceramic brick mold (made of fired clay in a previous video) was soaked in water and wood ash to make it slippery so that the clay would slide out easily. Bricks were then formed on the floor of half the hut. When the bricks had dried enough they were then stacked under the eaves to form a growing wall. I'll continue making clay bricks and when an opportunity rises, I will take them out and fire them, upgrading them from adobe bricks to fired clay bricks. These will in theory be used in a permanent hut constructed from bricks and mortar.
This video coincides with the release of my new book "Primitive technology", which releases exactly 4 years and 6 months since my first video post on this channel. This video compilation, as well as the book, outlines all the skills and achievements I've attained in this time period using research, hard work and trial and error. Writing this book is something I wanted to do even before making videos and launching this channel. I wanted to offer something tangible that benefited those who had the same keen interest in primitive technology as I do. With that, I thank each and every one of you for your continued support throughout the years, and I really hope you enjoy the book. You can pre-order here: https://penguinrandomhouse.com/primitive-technology - John Plant
I built a kiln from bricks for the purpose of firing bricks. I started by using a brick mold made of fired clay from a previous video and made bricks from clay. The bricks were allowed to dry and were then transported to my hut using a brick carrying harness I made from cane and a piece of wood. They were dry stacked onto the wall of the hut to keep them out of the rain while waiting to be fired. I then constructed a brick kiln using mud as a mortar for adhering the bricks together. The kiln had 2 fireboxes side by side and was of the updraft kiln type. The kiln was open at the front and back so it could be stoked from these areas. This gave a more consistent firing I found then a kiln only with firebox opening at the front. I put 40 un-fired bricks into the kiln and fired them for 2 hours 30 minutes. All the bricks were fired sufficiently. I then tested an un-fired brick and a fired one by putting them in water. The un-fired brick dissolved quickly while the fired one survived completely intact. The test was a success. My only issue is the bricks are a little weak due to the clay they're made of. I'll look at refining clay or finding a better source somewhere in this area.
Primitive Technology: Pot Made of Wood Ash - new clay alternative created by me.
I built a thatched workshop as an area to do future projects in out of the rain and weather. The structure was a 4 x 4 m square covered with a gabled thatched roof where the lowest point was 2 m above the ground and the highest point was 4 m. This is the largest hut I've built to date taking 5 weeks to build. The structure sheds rain quite well and being open and without walls allows smoke to exit without issue.
I made bricks using an old brickmold made in a previous video. The bricks were made from red clay from an old tree throw that became enlarged by when wild pigs used it as a wallow. This red clay was carried to a pit near the work site and tread on till it was the right consistency. The bricks were then allowed to dry. While this happened, I obtained good quality clay from the creek and made a new brick mold, a rectangular clay pot for washing mud from the mold and two other clay pots. I then made a kiln out of bricks and fired the mold, pots and some bricks. I then used the new mold and pots to make more bricks. The kiln is easy to build and has a 50 brick firing capacity. The bricks should be useful for building permanent structures in future.
In the 6 years since I developed the first forge blower (https://youtu.be/VVV4xeWBIxE) I had made very few improvements to it's design. So I decided to do some research and development to see if I could improve it's efficiency. From my research, increasing the number of fan blades from 4 to 8 yielded an increase of 19% volume of airflow. So I set about building a better fan. Instead of splitting the rotor and inserting blades made of bark into it, I made spokes from split cane to hold the blades leaving the rotor intact. This increased the longevity of the rotor as well as the spokes being heavier contributing more momentum, assisting the impeller in winding back in the other direction after each rotation. Instead of bark being used to for the blades, simple (and easier to find) folded leaves formed the blades. These, being flexible, are less likely to break against the walls of the housing as stiff bark does. Finally, a lid was added to the housing to make maintenance easier. The new
I smelted iron from iron bacteria and then cast the iron in a mold to form a rudimentary knife, making this the first iron tool I've produced yet. The ore was a species of bacteria that lives by oxidizing iron dissolved in ground water. It appears as an orange/yellow cloudy precipitate in creeks and ponds. It's a very common natural occurrence and can be found on all continents. I collected the diluted ore and poured it into a large, porous ceramic pot I made. The water leaked out, leaving behind the concentrated iron bacteria "mud" like substance. I dried it out until it resembled rusty earth. It took a month to collect the ore for one 2 hour smelt, from a stretch of creek about 20 meters long.
I built a trebuchet, a type of catapult that uses a counter weight to store gravitational potential energy which is then used to fire a projectile via a sling. I first built the frame which was made of two tripods set close together. They were of wood and lashed together with cane. Then I made a basket from cane to hold the large rocks that would act as the counterweight. For the sling I used bark fiber from dead branches of a certain type of tree. The bark was stripped and the inner bark woven into rope. The rope was then made into a sling using 2 knots and thinner rope was used to weave the sling pouch. A simple toggle release was used hold the throwing arm in position and act as the trigger. The counter weight was then filled with rocks and pulled into position to be held by the toggle. A shot-put sized stone was then placed into the sling pouch. When the toggle was released the stone would be launched 18- 20 meters (the length of the clearing) but could undoubtedly shoot further if
I made iron from ordinary sand in the creek. Sand contains a minor proportion of iron in the form of magnetite (and some hematite), the rest of the sand being other non iron minerals such as silica. In this form it is not concentrated enough to use as an ore to produce iron metal. However, it is possible to concentrate the magnetite grains from the silica sand using gravity separation, as magnetite is heavier than silica sand. So, I made a sluice box from a spare roof tile I made in an earlier video. The curved tile acts as a chute and grooves were carved into the concave surface perpendicular to it's length. When sand was put into the sluice and water was run over it, the heavier magnetite got trapped in the grooves and most of the lighter sand was washed away. The trapped iron sand was then tipped into a collection pot. This sand was then sluiced a second time to concentrate it further. From experiment, it was found that sluicing twice yields the best result for effort, sluicing a
Naturally occurring clay usually has impurities such as rocks and sand in it. There's a way to remove these by mixing the clay in suspension and draining that water off leaving the impurities behind. I started by digging a pit to receive the clay. Then dug clay from the creek bed and put it next to the pit in a pile. Water was mixed into the pile and it was allowed to sit for a while. The water/clay mixture was then drained off into the collection pit where it settled. This was done a number of times. After settling and the water seeping out, the pure clay was mixed with grog (crushed old pottery) and made into pots. The pots were fired and of good quality, making a ringing noise when flicked indicating no cracks or weakness. This method of purifying clay saves a lot of time and effort by removing the step of manually removing rocks from the clay body.
I made a small pottery wheel to form pots on. A pottery wheel is a small table on which pottery is formed that is able to be rotated about an axis to form more symmetrical pots. In this case it is a slow pottery wheel meaning that it is turned by hand rather than being turned at high speed by foot power or other means. A wooden frame was made to hold the axle for the wheel and a cane strip was used to hold the axle on to the frame while allowing it to turn. Then a clay table top was made to fit on top of the axle. A stone bearing block held the lower end of the axle. A clay pot was then formed onto it whilst turning the table to better access all points of the pot. The pot was then fired and tested. The slow wheel is good for forming pots but is hard to set up. It also turns too slow for pot throwing (spinning the pot at speed and forming with the hands by drawing the clay up). Future iterations might be a kick wheel with a fly wheel for momentum or some other means of powering the whi
I made a water filter from cane that siphons clean water from a dirty water while simultaneously using the xylem present in the the cane as a filter. MIT engineers had already proved that pine branches can be used as water filters as the thin membranes connecting the straw like xylem filter out 99% of bacteria such as E.coli which make water unsafe to drink. Taking this concept, I used a type of cane in the forest and bent them into hook shapes, tying them in place with vine. Then I put dirty water into a raised pot and siphoned clean water from it into a lower collection pot. Initially some sap comes (which is also harmless to drink) out but then water flows through the stem. It does take a while for it to work but the process can be sped up by adding multiple canes working in parallel. The water that came through is clean and I was able to drink it without ill effect. After a few days the canes clog up and need replacing though one cane laste
I tested 2 ways of improving iron smelts by treating the ore, roasting the ore and using snail shells as a flux. Then finally I recycled old slag to see if it would produce any more iron. The first way was to roast the ore before smelting. This drove off the moisture and volatiles in the ore as well as burning off any sulfur present. The resulting ore produced a higher yield of iron than normal (33g iron as opposed to about 15g iron as usual for the same volume of ore, charcoal and time). Next lime was added to the smelt as a flux in the form of snail shells. The theory was that the lime would lower the melting point of any silica in the ore to make a runnier slag and help the iron come together more. The result was very bad, no iron was produced apart from 1 or 2 prills. I suspect the ore is already basic in chemistry and adding a basic flux in the form of lime made it so basic that the slag was too viscous. The ore probably won't benefit from a basic flux but might benefit from an
I cleared an area as a workspace for making bricks, trialed a new source of clay for brick making and tested a new kiln variant that uses fewer bricks than the previous design. Near the existing brick hut, there is a area on a slight slope near a seasonal creek with a possible source of clay. The area had a large fallen tree in it that I burnt into 3 pieces and rolled out of the way with logs as levers. I may build a hut in this area and so cleared it. Next, I dug a pit to mix clay in and collected the new source of clay. The old brick mold (made in a previous video) was used to make 50 bricks that were then allowed to dry. While this was happening I dismantled the old kiln and used its bricks to make a new one. The new configuration uses only 74 bricks instead of the previous 100, a significantly simpler design. Its firebox is formed by crisscrossing 2 layers of bricks so that air enters in the first layer channels and wood enters the 2nd layer channels at right angles to the first.
I built a thatched shelter to make bricks in so that they are protected from the rain before they are fired. Despite it being the dry season, it still rains unpredictably in this climate. This can undo lots of labor in dissolving bricks. I built a shelter from wood and palm thatch to house the entire brick making process from the rain. This was no easy task with primitive technology. Leveling the ground took a week with digging sticks and clay pots to move the soil down the slope to form a flat floor. Another week was spent cutting the timber with a stone axe and then lashing the frame with lawyer cane to form the 3 x 3 pyramidal hut with a total height of 3.5 m. A final week was spent cutting, splitting and thatching a total of 1850 palm fronds to cover the roof. I then made 50 bricks (enough for one firing) along one side of the huts floor and made a kiln from other bricks right in the center of the hut's floor under the highest point of the hut. A space for firewood was put in the
I made a furnace insulated with wood ash to smelt iron in. Furnace insulation stops heat being lost from the walls of a furnace and so increases the heat within the furnace. Dry wood ash makes an excellent insulator for heat as the fine particles separated by small air gaps don't allow heat to conduct very well. To make the furnace a double layered wall of clay was made and the space between was filled with wood ash from different fires. The clay needed to be completely dry before doing so however as it was important the the ash not get wet, which would cause it to loose its insulating properties.The furnace was tested with an iron smelt and it produced 34g of iron from 10 charges of ore. It was going quickly to start with but then I had issues with the blower towards the end of the smelt (broken housing). The furnace design is promising though as this produced the third best smelt I've done in the wild with natural tools and materials (the best were 39g and 41g over a year ago). I'll
A Phoenix kiln is a type of downdraft kiln where the firebox is below the ware chamber. It was developed in America in the 1970's by George Wright and gets it's name from the Phoenix workshops. It is classified as a downdraft kiln because the flames go up into the ware chamber and then down to the exit flue of the ware chambers before going up a chimney. I built one from mud to learn about how it works and to see how hot it gets. The mud I used for the kiln is white clay from a flood area and it less than ideal for making pottery. I tested it and it worked ok but I knocked out the exit flue wall to make it behave more like a cross draft kiln before firing the pots. The kiln worked well in firing pottery despite the poor quality clay which cracked easily. If run for longer it probably would have reached higher temperatures.
In this video I use the thatched hut to fire bricks and make charcoal in for the first time. To make and fire bricks, a workspace protected from the rain must be made to protect the bricks from dissolving before they are fired. Built in a previous video, the hut was used as a space to fire the bricks. The firing went well with no issues with the thatch catching fire due to the height of the roof above the kiln. In addition to the hut being a place to make bricks, I made a charcoal mound in the space left over to make charcoal, a fuel for smelting iron. I had a previous charcoal mound out in the weather but the rain was an issue keeping the wood damp before getting a chance to fire it. So I made a 75 cm diameter re-useable charcoal mound and it produced 6 and a half pots of charcoal.
I built a natural draft furnace and smelted iron ore in it, producing a small amount of iron. A natural draft furnace is one where the draft is supplied by convection alone. This is opposed to a forced draft where bellows or fan is used to supply air flow instead. Natural draft furnaces are typically taller than forced draft furnaces to make use of the stack effect. They also often have multiple large air entries or tuyeres to help reduce resistance to air flow. Natural draft furnaces where used to smelt iron in ancient times in Europe and up to more recently in Africa where some are still standing. The lack of the need for bellows reduces labor and complexity.
I made a fish trap from cane and tested it over the course of a year catching various aquatic animals. Initially, I intended catching eels with it but instead it caught fish, crayfish and even a fresh water crab. These were then released back into the wild. This type of trap is made in two parts, a basket and a funnel. The funnel is inserted into the the opening of the basket so that animals venture into the trap easily but have difficulty exiting. The trap requires no bait to work and can be reused over as long as it's intact. The video also shows the huts in the rain season.
I tested the one-way spinning blower in an iron smelt and it is more effective than the previous both way spinning blower. Using the same amount of ore and charcoal, the original blower yielded 30 g of iron where as the new blower yielded 51 g. The previous all time record was 41 g from several years ago but the new blower it beat that by 10 g on its first run. The energy saved by having the fan spin constantly in one direction no doubt contributes to the better performance of the blower. As with the old blower, the new one produces high carbon iron prills (cast iron blobs) in slag. The brittle slag crushes easily while the iron prills remain intact to be picked out by hand or gravity separated with panning. The iron prills were also quite large and more numerous than smelts done with the old blower.
The thatched workshop where I produce bricks, pottery, cement and charcoal for various projects was destroyed by prolonged rain from the wet season. Built less than a year ago, the thatch had deteriorated due to moth larvae and mold consuming it. The rain got through and rotted the lashings holding the roof up and it collapsed. In contrast to this, the brick and wood ash cement hut still stands after 2 years due to the permanent building materials. A second smaller thatched hut was built to continue the brick making process but even that was made difficult by the weather with that thatch rotting in less than a month. In the long term, a workshop made of permanent materials, similar to the main brick and wood ash cement hut, will have to be built in order to continue production of ceramic materials. The problem is that there needs to be such a structure to produce the building materials needed to build that very structure.
I have made wood ash cement before under the assumption that it was the calcium in the ash that gave it its cementitious properties. It may however be a type of geopolymer cement, where the cement is activated by and acid or a base (in this case a base). The acronym NASH is used to remember the material needed: sodium, alumina, silica and H2O. All of these are present in the materials used here. I did some experiments to see how to produce the cement using ash and fired clay from broken bricks. The first method was to take ash from a cold fire and form it into pellets. One pellet was left aside to dry while the others were calcined by firing them in a forge with wood. The calcined pellets were then mixed with terracotta in different proportions (ash: clay 1:0, 1:1, 1:2, 1:3). All samples survived a water test after setting for a week except for the sample made from cold ash that had not been calcined. This demonstrates the need to calcine the ash at a high temperature before use. Next
I made charcoal in a clay pot by putting wood in it and heat the pot externally effectively making it like a retort. Previous methods of charcoal making directly heat the wood by burning a portion of it to create the charcoal. But this method applies the heat indirectly to the wood with it completely sealed off from oxygen. The wood successfully turns to charcoal on a small scale but fails to scale up due to the larger pot cracking during the firing and letting air in which burns the wood to ash. The theory is sound but more work needs to be done on the pot to stop it from cracking.
I made a hashbrown from Polynesian arrowroot. A hashbrown is typically made from potatoes where it is mashed and baked on a pan. Here I made it from wild growing Polynesian arrow root instead of potato. I'd made Polynesian arrowroot starch before but this time I cooked the mash along with the starch. It made a sort of gelatinous pancake, similar to dishes made with cassava. The mash needed soaking in water to eliminate bitter compounds that make it unpalatable. The pancake was starchy and still slightly bitter due to time constraints but would taste better if soaked and drained more times. It would make a good famine food if none other were available as the starch is high in energy.
I built a Water Bellows. It’s an upside-down clay pot with an inlet valve and an outlet spout. The inlet valve is simply a hole in the pot with a leaf plastered to the inside with wet clay so that it forms a one-way flap valve. When pushed down into water, the valve shuts and air is forced out of the spout and into the fire. When the pot is lifted in water, air is sucked in through the open inlet valve and the cycle repeats. I got the idea from a Food and Agriculture Organization website I saw years ago. A Google image search for “FAO water bellows” gives an image of someone using a more complicated version at a brick forge in Zimbabwe, possibly from 1994, but I can no longer find the original diagram or description. From memory, the air and water containers were steel drums and there was a U-shaped pipe to convey the air down from inside the air drum when lowered, through and out the water drum and into the fire. Air entered an inlet valve in the top of the air drum when lifted. The
With the wet season only 2 months away and thatch being an impermanent material, I needed to make more roof tiles for a new hut that will withstand the next deluge. The only existing hut I have that weathers the rain well is my brick and tiled hut. Previously I put most of my effort into brick making, but decided that roof tiles are more valuable in the short term as they can be used on a mud walled structure and will last as long as the mud and timber stay intact. But to make roof tiles I needed a large shelter to protect them while being made and drying. Previous workshops I built to house brick and tile production were large thatched huts on posts. These huts took a long time to build ranging from 3 to 5 weeks and requiring more timber. This time I built an A-frame hut for the same task. It only took 10 days to build and covered a large floor space, 4 x 4 m. If the job of the shelter is to only house materials then tall side walls are not necessary, only a large floor space.
I built Mud walls and capped them with roof tiles to protect them from rain. Mud walls if left uncovered in wet weather will dissolve in the rain and collapse. I wanted to test a solution to this problem by covering the walls with roof tiles. I start the video firring the roof tiles made in the previous video before making another batch to dry out ready for firing. Then I started building the mud walls by digging a foundation trench and filling it with rubble. The rubble was then capped with large stones completing the foundation. This was done so that water at ground level wouldn't wick up the mud wall and weaken it. The mud was then made from water and soil around the build site. The mud was then piled in layers about 5 cm thick and 25 cm wide to form 2 opposing walls 2.25 m long. When the wall was 75 cm high, the bricks were laid on one side of the tops of the walls and the tiles put on these in such a way as to give them a 30 degree slope. It then rained on the walls without ill ef
I built a hut with two gabbled end walls made of mud, supporting a roof of wooden poles covered with fired clay barrel tiles. The video shows the entire project which took 2 and a half months of work. It begins with the making of a thatched A-frame hut as a workshop for making tiles. The tiles were made from clay and fired in a kiln made from bricks made in previous videos. A 2x2 m hut was then built by making two walls of mud in the shape of a wall and gable. Between 1.25 and 1.6 tons of soil were used to make these walls. The roof was formed by spanning the two walls with timber that was then covered with tiles. The hut shed rain reasonably well but it remains to be seen how it will fair in the long wet season which is starting now. The main benefit of this hut is how little material is used in the walls considering that there are no side walls, significantly reducing labor and materials. It will be an experiment in how this building method works.
The brick hut was destroyed by a falling tree. It had lasted 2 years and 8 months and would have lasted quite a bit longer if it were not for the accident. I recovered the tools and materials that were in the hut and then salvaged the bricks and tiles from it that were still intact. A large pile of about 750 bricks was stacked up to be used in other projects. Also in this video I show how the other huts in the area are in the wet weather. I do maintenance on the roof of the most recently completed one as it needed a beam replaced due to rot. I'll most likely build something with the salvaged bricks when the weather becomes drier so I can calcine ash to make mortar.
I tested a fly wheel on the blower
I took the iron I already smelted and re- smelted it. The iron was old and rusty from forging experiments. Iron oxidises faster when in the forge due to the hot and oxidising conditions. So I tried smelting it again to turn the rust back into iron. The first attempt involved charging the iron into a furnace in a single charge. The results were mixed, the iron was in separated pieces though the iron was softer and could be slightly cold forged. Next the iron was included in an iron smelt with fresh, roasted ore. 3 charges of ore were charged, then the scrap iron and then another 3 charges of ore. The result was cleaner but the iron was still in separate pieces.
I tested a charcoal retort based on the Hookway retort method using only primitive materials. A normal retort is one in which the sealed chamber of wood is inside a furnace and the heat drives off the volatiles converting it to charcoal. The Hookway retort, invented by James Hookway (see original video: • The best charcoal retort kiln in the ... ) has furnace, a metal pipe, inside the sealed chamber of wood, so the heat conducts out into the wood converting it to charcoal. In addition to this, escaping volatiles from the wood enter the pipe where they are burnt, adding further heat. After a while, no more wood is added to the furnace as it runs entirely of wood gas. In my version I made a clay pipe and tested it. It did produce some charcoal but most of the wood remained unburnt. This was due to the poor heat conductivity of the clay pipe relative to the metal pipe of the original. The charcoal it did produce from wood touching the clay pipe directly, was of excellent quality. An
Certo, ecco il riassunto ancora più sintetico, mantenendo le persone verbali originali, questa volta in inglese: --- I built a **belt and pulley drive** for a blower because the previous rope-and-stick system limited RPMs, producing only low pressure and non-solid blooms. The belt allows continuous rotation and higher RPMs. I tested **clay wheels** (heavy but the small one worked) and **cane wheels** (lighter, but with mounting issues). A "floating" cane version worked better, but isn't scalable. Current wheels (25 cm) give 1:10; the new system should reach 1200 RPM (from 960). 50 cm wheels would give 1:20. Future experiments are needed.
I built two water bellows to use in tandem for smelting. Previously I made and tested one water bellow. It was small and was fired in a pit. For this project I made two that had a deeper stroke than the last one. I also fired it in a kiln so it would be stronger. I made a wide based tuyere for the two spouts of the bellows to fit into during use. When one bellow was lifted the other dropped so that a constant but intermittent stream of air entered the fire. The bellows worked well initially but then the handle came off one. So I attached wooden handles to both and they were easier to operate. I got about 2 hours of use and then the spout broke off one. This was probably due to a low firing temperature in the kiln, I could fix that problem the next time I do a firing by adding fewer layers of bricks in the bottom of the kiln. Also, the design could be modified to make the spout stronger.
I made mortar from wood ash and crushed terracotta and then used it to mortar bricks together. The ash from previous brick firings was formed into pellets and re-fired in the kiln to calcine it. There is calcium in wood ash which behaves the same as limestone when burned so it will set after being wetted and allowed to dry. The aggregate was crushed terracotta from old broken bricks. These contributed alumina and silica which along with the sodium and silica from the ash form aluminosilicate chains, forming a geopolymer. It forms a noticeably stronger mortar than the previous on I made from wood ash and sand. Also the terracotta is easier to source than sand in this location. Mixing 1 part ash to 3 parts terracotta yielded a useable mortar. A sample was tested after 9 days of drying and did not dissolve in water. I'll likely investigate easier ways to produce this material in future so I can build more structures with brick.